Hi everyone! It's been a while but I have a new pattern!!!
Packy the Triceratops is cute and cuddly. Every time I would look for a pattern to make a dinosuar I never found one I wanted. So i decided to make my own. Now I want to share it with you.
Be sure to check out my youtube channel (link below). It is new and I am working to add video of how to make certain parts of my patterns, sew and promoting my books. Right now there is a clip that you can see me switching colors mid row or see shorts how Pack turns out.
I hope you enjoy this pattern and DO NOT copy the pattern and list on your website for money. This is my pattern and I am sharing it. If you make Packy you are welcome to sell your creation at craft shows or anywhere. :) I would love to see how you stuffy turned out. All of my socials are Jessie Lynn Creativity.
Yarn colors: Dark Green, light Green, white.
Safety eyes
Size C – 2.75 mm
Fiberfill
- Pins
Size: 6 in tall X 5 12 in wide X 6 in depth
St = stitch
INC = increase
DEC = Decrease
SC = Single Crochet
Slip stitch = slip stitch
Color changes are indicated before the stitches they’ll be used for.
BLO = Back Loop Only
Using Dark Green yarn, 2.75 mm hook
Round 1: SC Magic ring 6 (6)
Round 2: INC in each ST around (12)
Round 3: SC in 1 ST, INC in the next ST, repeat around (18)
Round 4: SC in 2 ST, INC in the next ST, repeat around (24)
Rounds 5-8: SC in each ST all around (24)
Round 9: SC in the next 3 ST, INC in the next ST, repeat around (30)
Round 10: INC in the next ST, (SC in 2 ST, INC in the next, repeat 4 times) SC in the next 7, INC in the next, SC the last 7 (36)
Round 11: INC in the next ST, (SC in 2 ST, INC in the next, repeat 5 times) SC in the next 20 (42)
Round 12: SC in each stitch all around (42)
Round 13: (SC in 2 ST, INC in the next, repeat 6 times) SC in the next 24 (48)
Round 14-16: SC in each ST all round (48)
Round 17: SC in 6 ST, then DEC in the next, repeat 6 times (42)
Round 18: SC in each ST around (42)
SAFETY EYES: Row 11-12 add safety eyes 10 stitches apart.
Round 19: SC in the next 5 ST then DEC in the next, repeat around (36)
Round 20: SC in 3 ST then DEC in the next repeat 5 times, SC in the next 9, DEC in the next (30)
Round 21: SC in 1 ST, DEC in the next (repeat 6 times) SC in the next 9, DEC in the last. (24)
Round 22-25: SC in each ST all around (24)
Onto the body!!!
Round 26: SC in the next 3 ST, INC in the next, repeat around (30)
Round 27: SC in the next 4 ST, INC in the next, repeat around (36)
Round 28: SC in the next 5 ST, INC in the next, repeat around (42)
Round 29-30: SC in each ST all around (42)
Round 31: SC in the next 6 ST, INC in the next, repeat around (48)
Round 32: SC in each ST all around (48)
Round 33: SC in the 4, INC in the next, repeat 6 times, SC the next 18 (54)
Round 34: SC in the next 4, INC in the next, repeat 6 times, SC in the next 24 (60)
Round 35-38: SC in each ST all around (60)
Round 39: SC in the next 5, DEC in the next, repeat 5 times, SC in the next 24 (54)
Round 40-41: SC in each ST all around (54)
Round 42: SC in the next 4 ST, DEC in the next, repeat 5 times, SC in the next 18 (48)
Round 43-44: SC in each ST all around (48)
Round 45: SC in the next 6, Dec in the next, Repeat around (42)
Round 46-47: SC in each ST all around (42)
Round 48: SC in the next 4 ST, DEC in the next, repeat 5 times, SC in the next 7, DEC in the next, SC in the next 3 (36)
Round 49-50: SC in each ST all around (36)
Round 51: SC in the next 4 ST, DEC in the next, repeat around (30)
Round 52: SC in the next 3 ST, DEC in the next, repeat around (24)
Tail
Round 53: DEC in the first ST, SC in the next 11 ST, DEC in the next, SC in the next 9 ST, (22)
Round 54: SC in each ST around (22)
Round 55: SC in the next 2 ST, DEC in the next, SC in the next 5 ST, DEC in the next, SC in the next 11 ST (20)
Round 56-57: SC in each ST all around (20)
Round 58: SC in the next 3 ST, DEC in the next, SC in the next 4 ST, DEC n the next, SC in the next 8 ST (18)
Round 59: SC in each ST all around (18)
Round 60: SC in the next 4 ST, DEC in the next, SC in the next 3 ST, DEC in the next, SC in the next 7 ST (16)
Round 61: SC in each ST all around (16)
Round 62: SC in the next 3 ST, DEC in the next, SC in the next 2 ST, DEC in the next, SC in the next 7 ST (14)
Round 63: SC in each ST all around (14)
Round 64: SC in the next 3 ST, DEC in the next, SC in the next 2 ST, DEC in the next, SC in te next 5 ST (12)
Round 65: SC in the next 3 ST, DEC in the next, SC in the next 2 ST, DEC in the next, SC in the next 3 ST (10)
Round 66: SC in the next 2 ST, DEC in the next, SC in the next 2 ST, DEC in the next, SC in the next 2 ST (8)
Round 67: SC in the next ST, DEC in the next, SC in the next SC, DEC in the next, SC in the next 2 ST (6)
Round 68: DEC around and tie off the end. Weave the yarn so the end makes a point. (3)
Weave in the extra yarn back into the body.
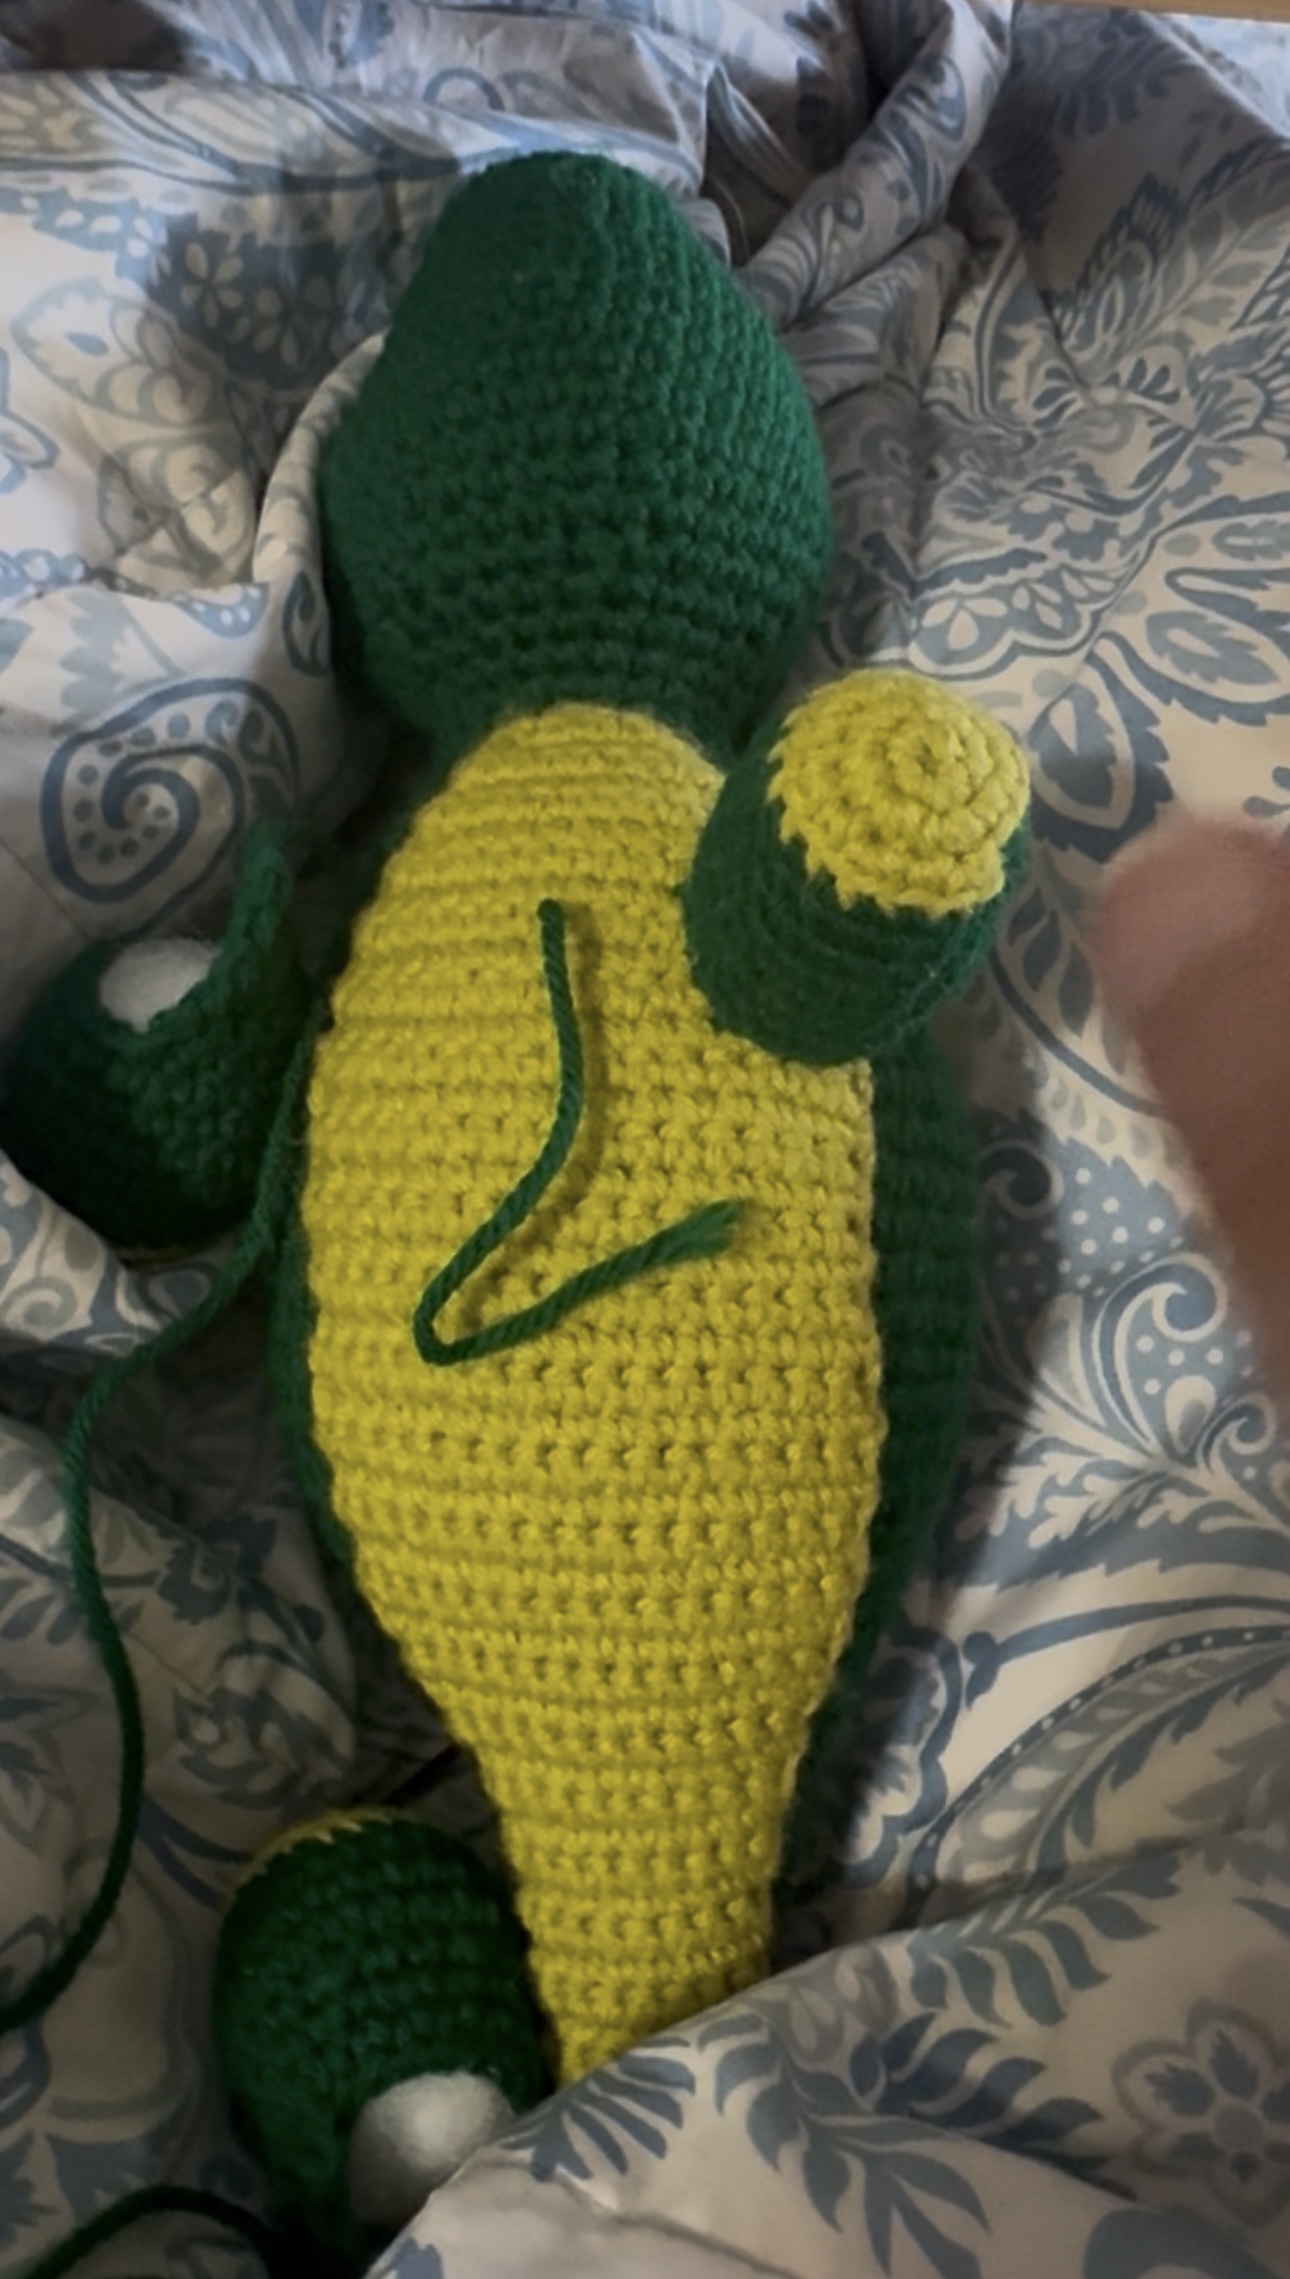
For the belly we will be working in rows. Once this piece is finished, we will be sewing it to the body.
Using Light Green yarn and 2.75 mm hook.
Row 1: Ch 2, turn
Row 2: SC in 1 ST, CH , turn (1)
Row 3: INC in the ST, Ch 1, turn (2)
Row 4: SC in the 1 ST, INC in the next, Ch 1, turn (3)
Row 5: SC in the 1 ST, INC in the next, SC in 1 ST, CH 1, turn (4)
Row 6: SC in 1 ST, INC in the next, SC in the next 2 ST, CH 1, turn (5)
Row 7: SC in the next 2 ST, INC in the next, SC in the next 2 ST, Ch 1, turn (6)
Row 8-9: SC in each ST, CH 1, turn (6)
Row 10: INC in 1 ST, SC in the next 4 ST, INC in 1 ST, CH 1, turn (8)
Row 11-14: SC in each ST, CH 1, turn (8)
Row 15: INC in 1 ST, SC in the next 6, INC in 1 ST, CH 1, turn (10)
Row 16-17: SC in each ST, CH 1, turn (10)
Row 18: INC in 1 ST, SC in the next 8 ST, INC in 1 ST, CH1, turn (12)
Row 19: SC in each ST, CH 1, turn (12)
Row 20: INC in 1 ST, SC in the next 10 ST, INC in 1 ST, CH 1, turn (14)
Row 21: SC in each ST, CH 1, turn (14)
Row 22: INC in 1 ST, SC in the next 12 ST, INC in 1 ST, CH 1, turn (16)
Row 23-40: SC in each ST, CH 1, turn (16)
Row 41: DEC in 1 ST, SC in the next 12, DEC in 1 ST, CH 1, turn (14)
Row 42: SC in each ST (14)
Row 43: Dec in 1 ST, SC in the next 10, DEC in 1 ST, CH 1, turn (12)
Row 44: SC in each ST (12)
Row 45: DEC in the next, SC in the next 8 ST, DEC in the next, CH 1, turn (10)
Row 46: SC in each ST, CH 1, turn (10)
Row 47 DEC in the next, SC in the next 6 ST, DEC in the next, CH 1, turn (8)
Row 48: DEC in the next, SC in the next 4 ST, DEC in the next, CH 1, turn (6)
Row 49: DEC in the next, SC in the next two, DEC in next, CH 1, turn (4)
Row 50: DEC twice, tie off (1) leave a long tail for sewing.
When sewing to the body I like to use knitting needles to hold it in place where I would like the piece to sit. For the tip of the tail, I started in between row 67 and 68, Almost to the view tip but enough that I see a dark green edge. I stretched the piece all the way to the neck around row 25. Don’t worry about having space for the legs, we will be stitching the legs over the light green and dark green later.
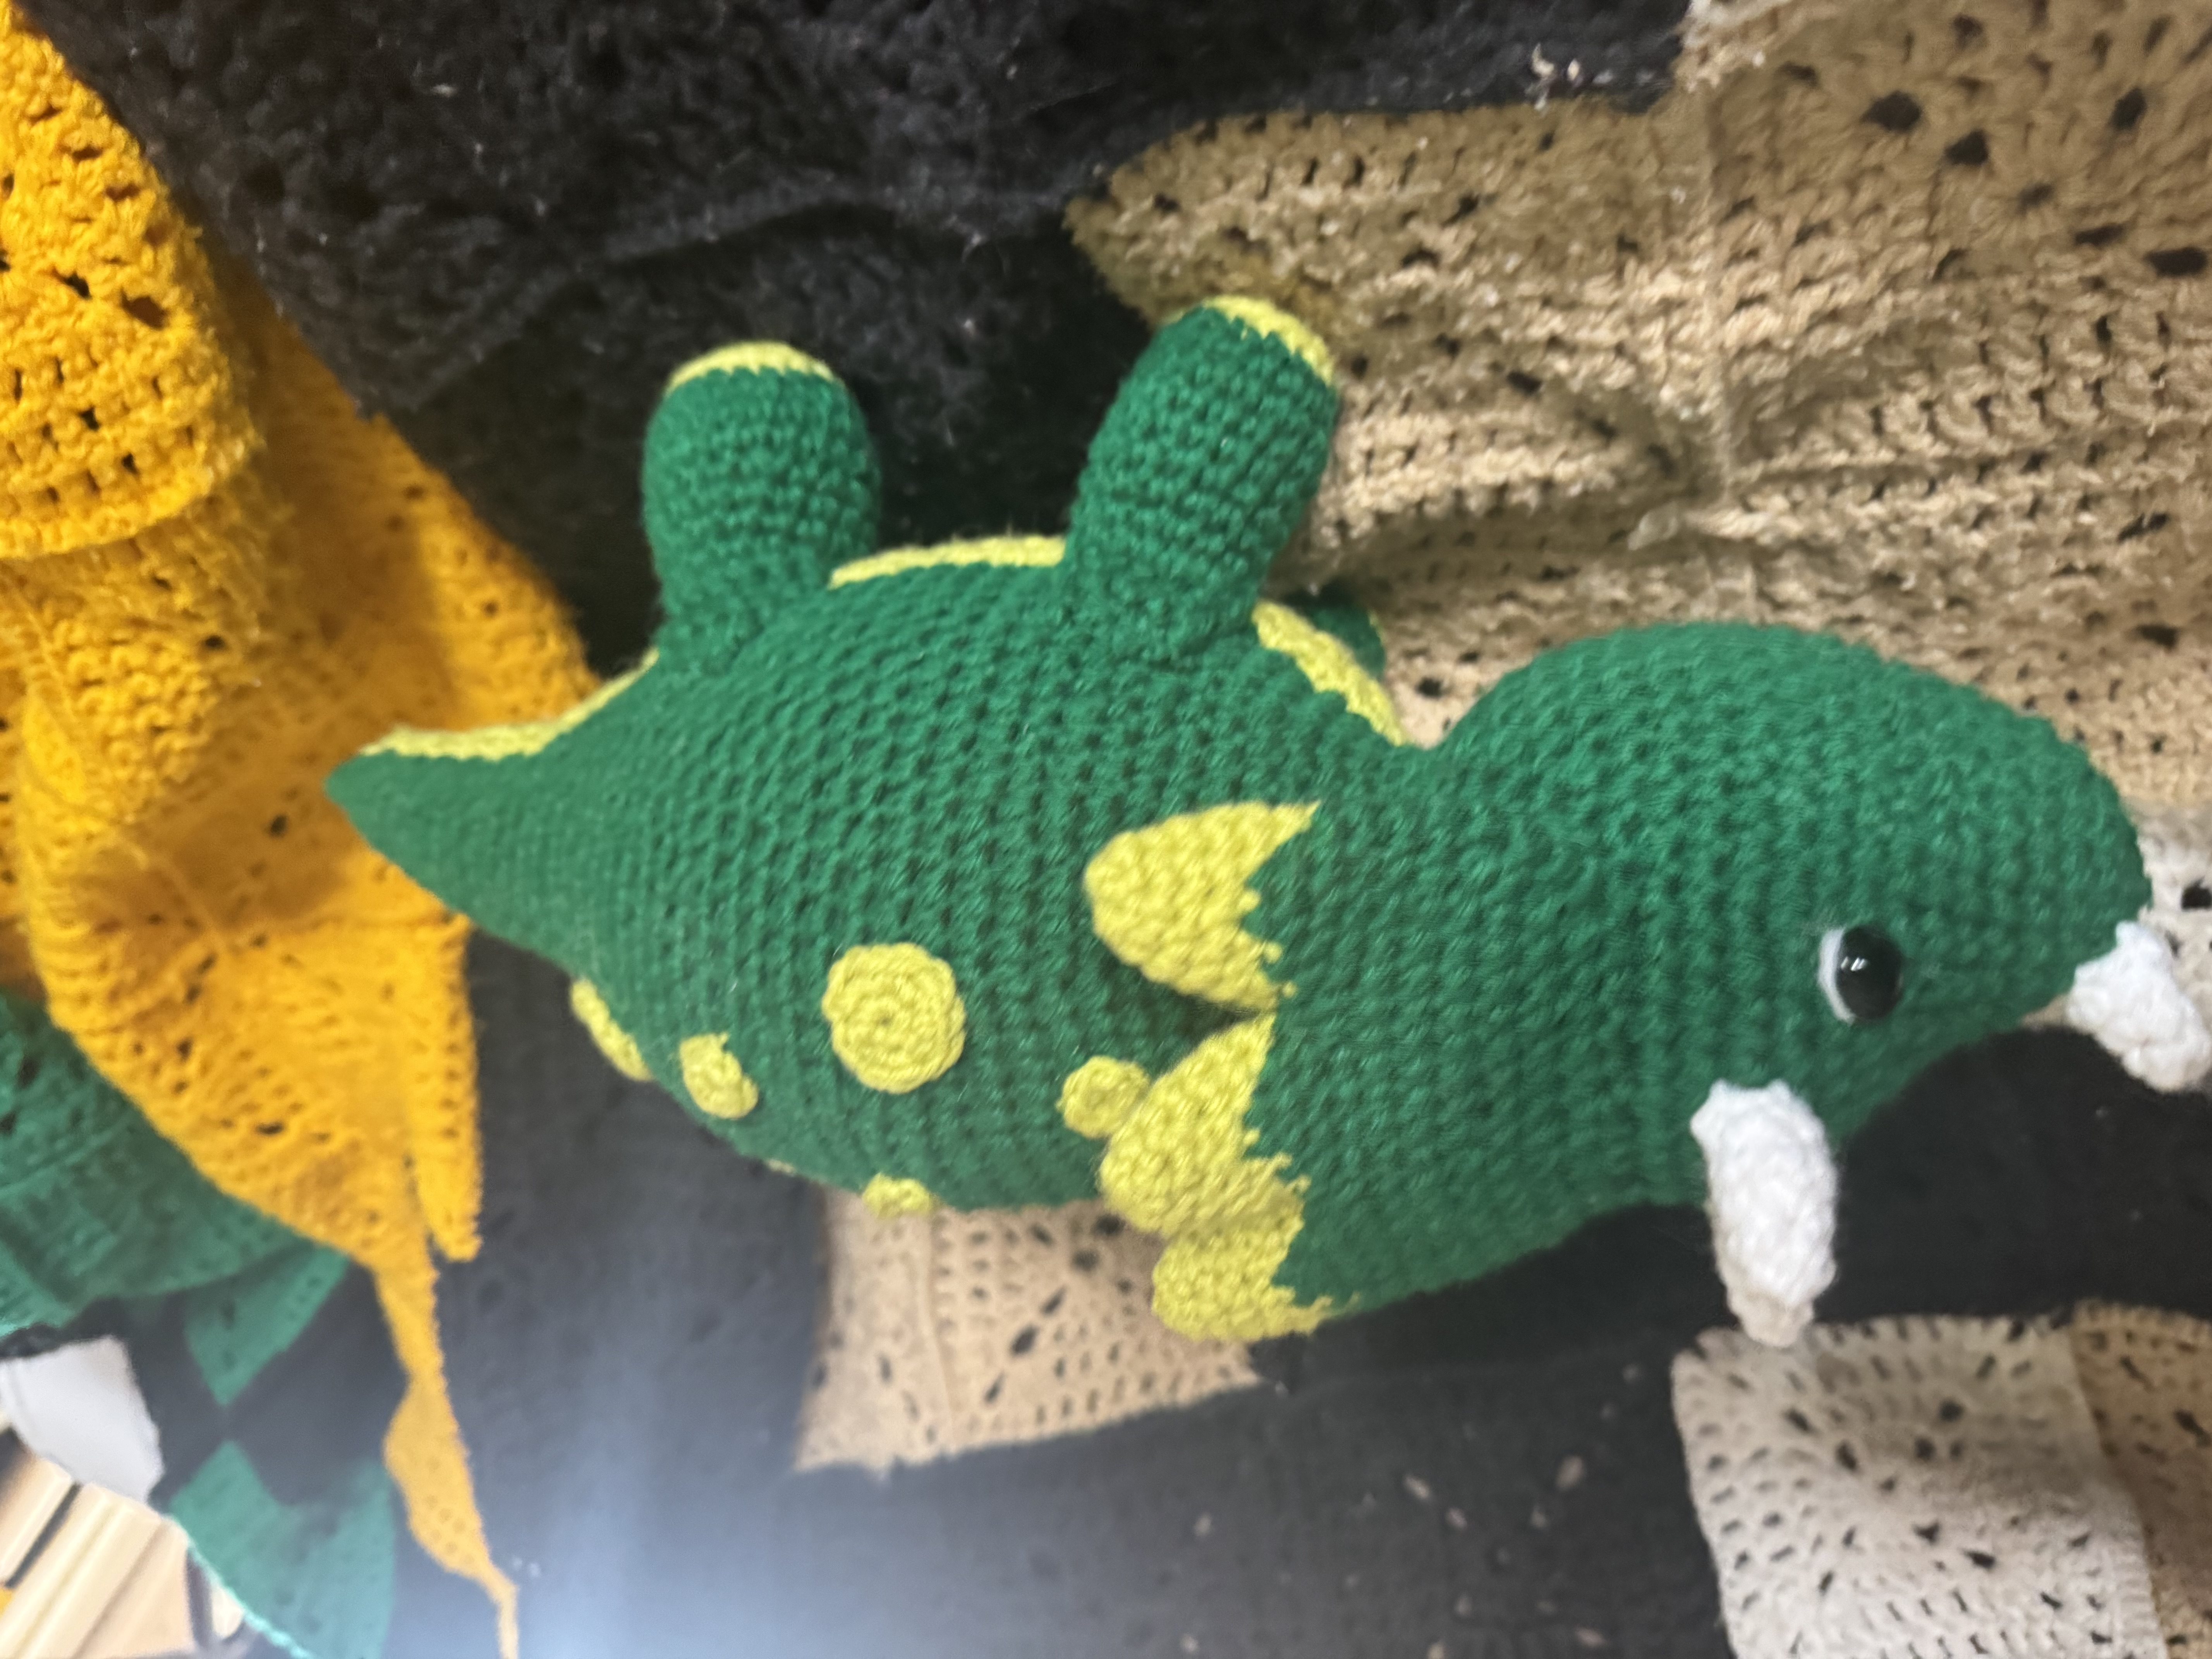
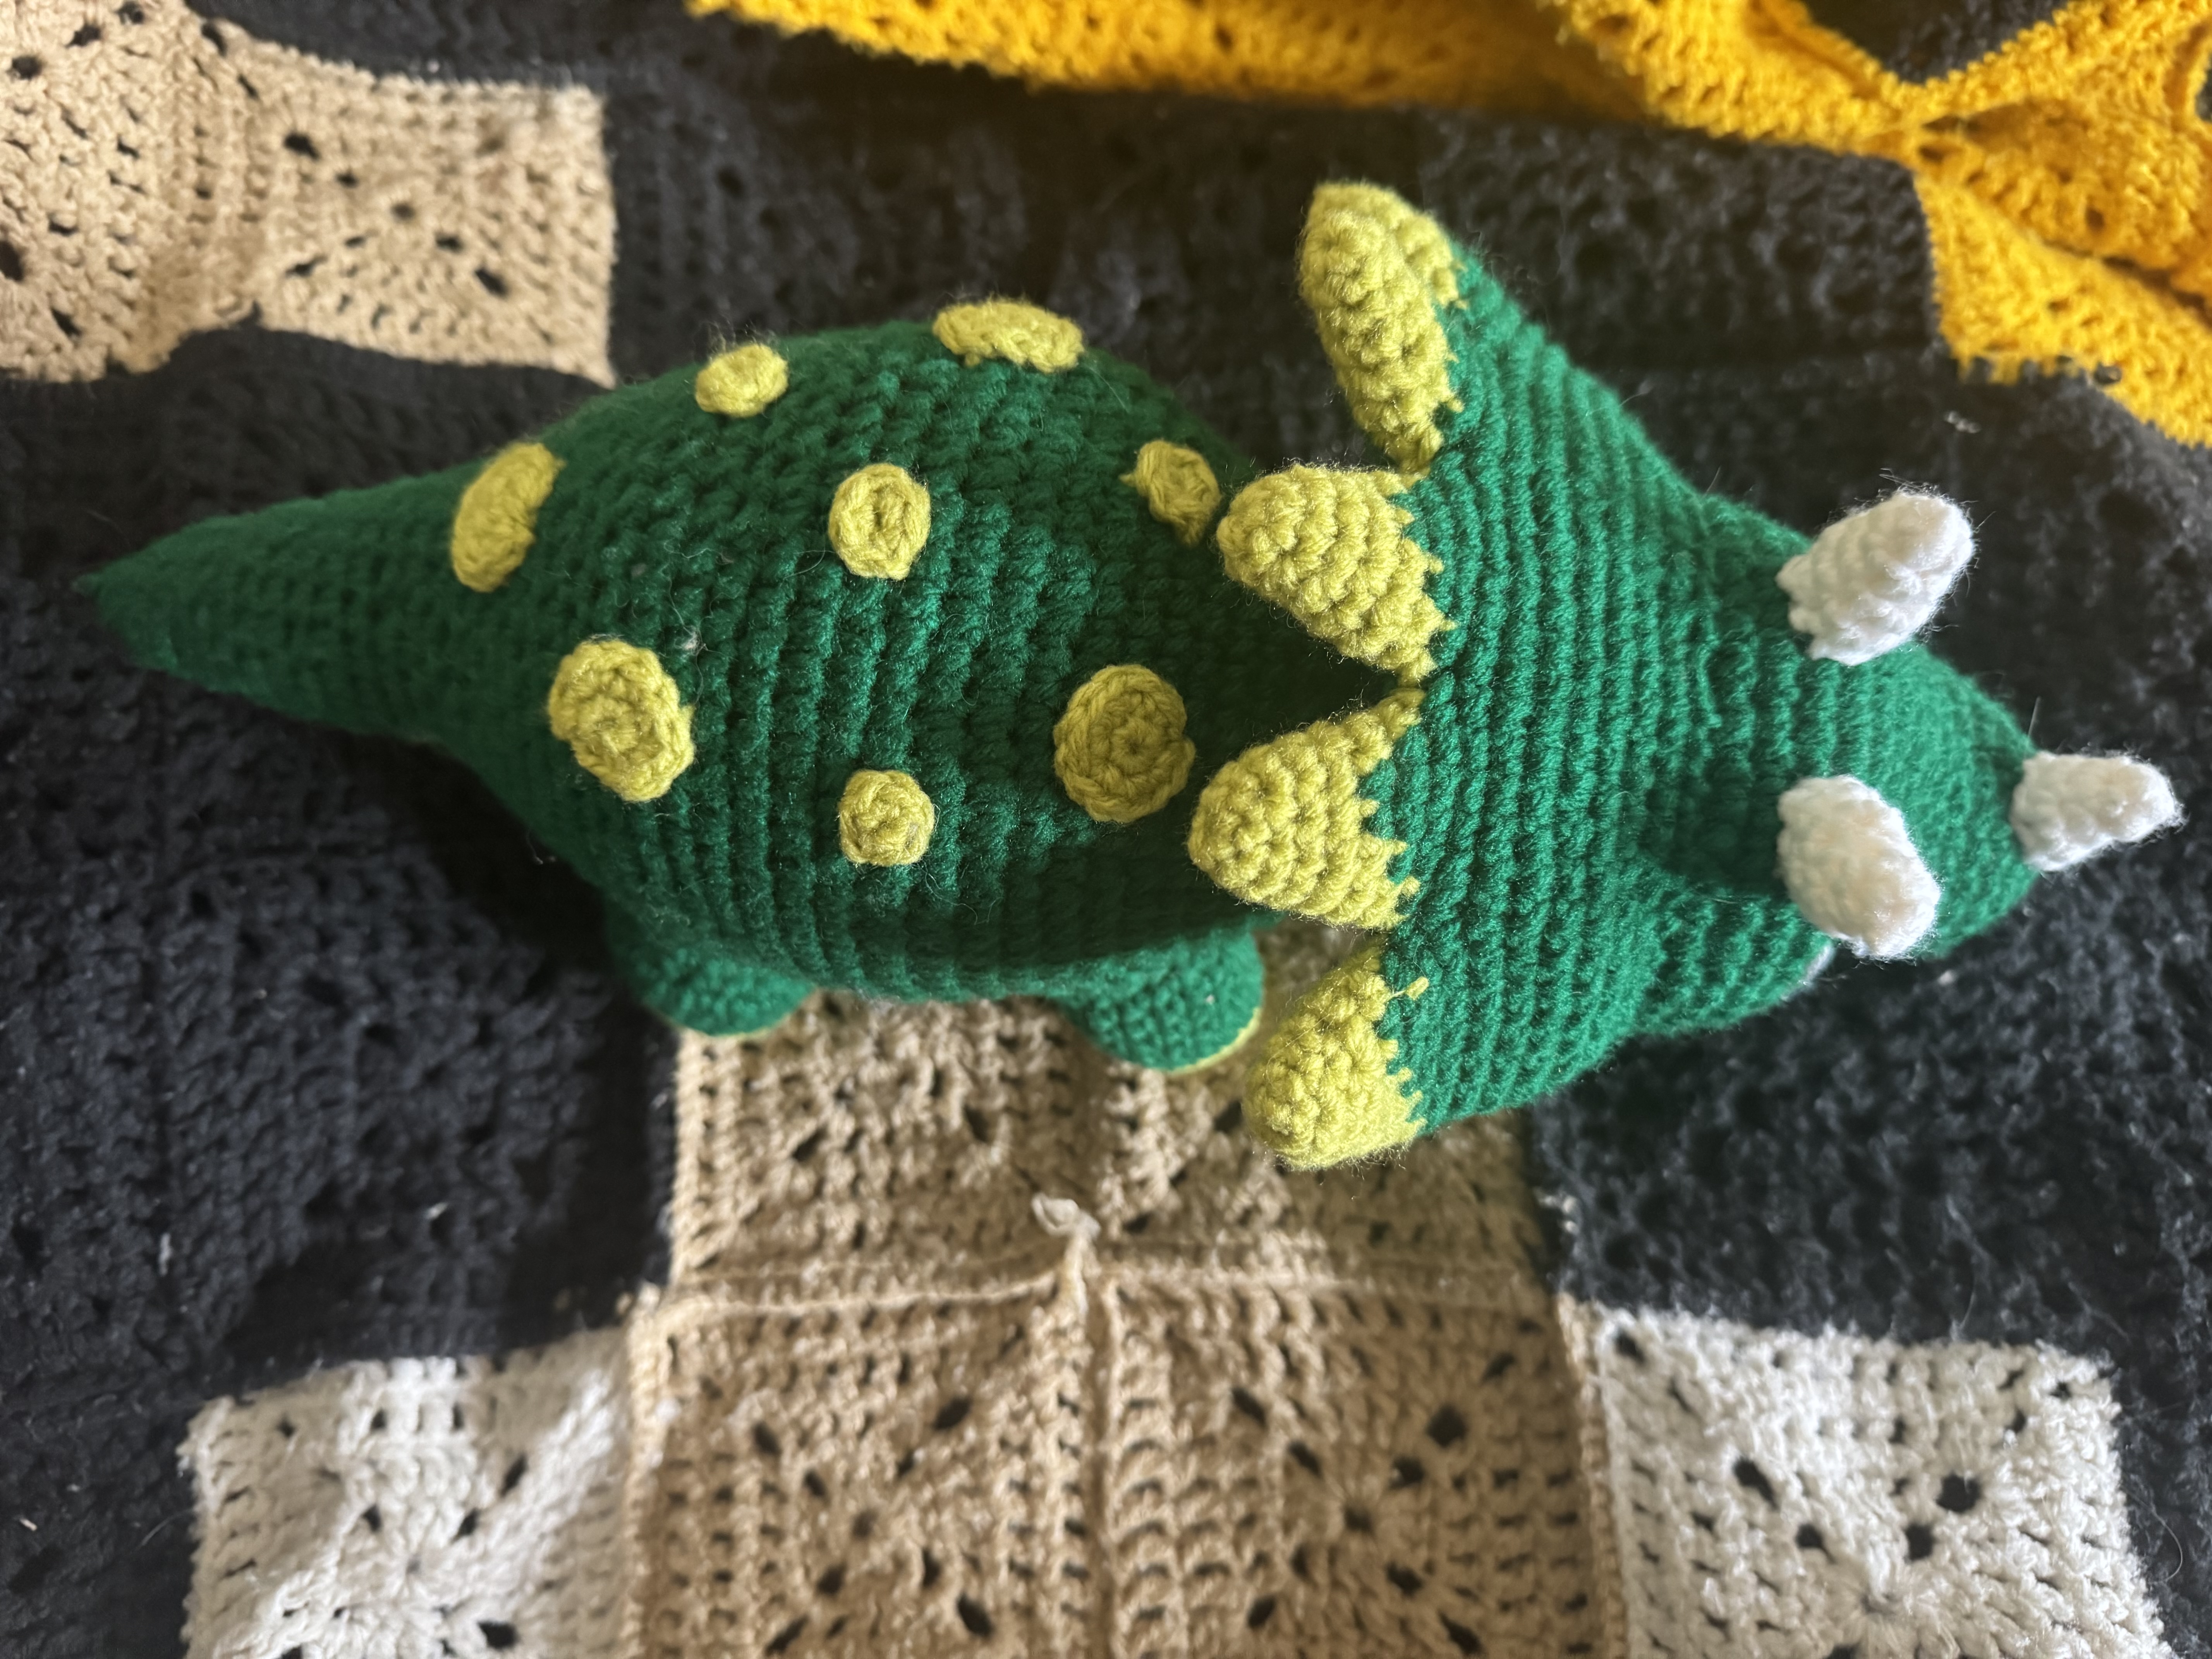
Make 5 of these horn pieces. Start with Light Green and then we will use the Jacquard method to add in some Dark Green. The rounds combining the horn pieces will be with the Dark green yarn. If you are not comfortable switching colors mid row you are welcome to make the entire head piece Dark Green. This is your project so use whatever color method you want. ;)
Round 1: Magic ring 6
Round 2: SC in each ST (6)
Round 3: INC in 1 St, SC in the next, repeat around. (9)
Round 4: SC in each ST (9)
Round 5: SC in the next 2 ST, INC in the next, repeat around (12)
You will be switching from light green to dark green. LG (light green) DG (dark green)
Round 6: SC in the next 2, (DG) SC in the next 2 ST, (LG) SC in the next 4 ST, (DG) SC in the next 2 ST, (LG) SC in the next 2 ST (12)
Round 7: (LG) SC in 1 ST, (DG) SC in the next 4 ST, (LG) SC in the next 2 ST, (DG) SC in the next 4 ST, (LG) SC in 1 ST (12) fasten off and tie off the two colors. Don’t cut off the last horn.
When you finish the last horn piece switch to DG and tie off LG. continue across the front of each horn and combined them all together.
Round 8: SC across the front 6 ST, then move onto the next horn, Once you're at the last horn continue to the back 6 ST. Continue combining the back 6 ST like you did the front. This will be your Round 8 (60)
Round 9-12: SC in each ST (60)
Round 13: SC in 7 ST, DEC in the next, repeat around (54)
Round 14: SC in each ST around (54)
Round 15: SC in the next 7 ST, DECN in the next, repeat around (48)
Round 16: SC in the next 6 ST, DEC in the next, repeat around (42)
Leave a lot of yarn for sewing. Tie it off and stitch it to the head.
When sewing to the head the front side I sewed to right 15, the back of it is sewn to row 16 and 17 to make it sit nice. There is no stuffing in this piece, it is just pressed together. You want to make sure it is angled to slick back like the pictures.
Nose horn
Round 1: magic ring 4
Round 2: SC in each ST (4)
Round 3: INC in each ST around (8)
Round 4: SC in each ST around (8)
Tie off and stitch to nose between rows 2-5
Forehead horns
Round 1: Magic ring 4 (4)
Round 2: SC in each ST (4)
Round 3: INC in each ST around (8)
Round 4-5: SC in each ST around (8)
Tie off and leave yarn long enough for sewing. I didn't stuff any of these horns. I used the excess string from the magic ring and stuffed that inside the horn. Stitch to the forehead at rows 12-14. With 4 stitches in between them.
HIND LEG (make 2)
Note: in Row 11, there are two different versions of this row written below. This helps keep the spot where you switched yarn at the back of the legs.
Light green
Round 1: Magic ring 6 (6)
Round 2: INC in each ST (12)
Round 3: SC in 1 ST, INC in the next (18)
Round 4: SC in the next 2 ST, INC in the next, repeat around (24)
Work in Dark Green for the remainder.
Round 5: BLO in each ST around (24)
Round 6-8: SC in each ST around (24)
Round 9: SC in the next 2, DEC in the next, repeat around (18)
Round 10-11: SC in each ST around (18)
Row 11 FOR OPPOSITE LEG: SC in each ST around, CH 1, turn
Row 12: SC in the next 8 ST, CH 1, turn (8)
Row 13: DEC in the first, SC in the next 6, CH 1, turn (6)
Row 14: DEC in the first, SC in the next 4, CH 1, turn (5)
Row 15: DEC in the first, SC in the next 3, CH4 1, turn (4)
Row 16: DEC in the first, SC in the next 2, tie off and leave extra yarn for sewing the legs to the body. (3)
FRONT LEG (make 2)
Note: in Row 11, there are two different versions of this row written below. This helps keep the spot where you switched yarn at the back of the legs.
Round 1: magic ring 6 (6)
Round 2; INC in each ST (12)
Round 3: SC in 1 ST, INC in the next, repeat around (18)
Switch to Dark Green and use it for the remainder of the leg.
Round 4: BLO in each ST around (18)
Round 5-10: sc in each ST around (18)
Row 10 FOR OPPOSITE LEG: SC in each ST around, CH 1, turn (18)
Row 11: SC in 7 ST, ch 1, turn
Row 12: DEC, SC in 5 ST, CH 1, turn
Row 13: DEC, SC in 4 ST, CH 1, turn
Row 14: DEC, SC in 3 ST, Ch 1, turn
Row 15: DEC, SC in 2 ST, CH 1, tie off and leave extra yarn for sewing to the legs to the body.(3)
Sew the front legs between row 32-38. The extra legnth goes on the outside and up the body. Stitch the legs onto the light green as well.
This is where preforming both row 11 will put that color changing spot at the back of the legs. For the back legs sew them to the body between
Row 47-51. It'll seem the back legs are a little longer then the front legs. I did this so Packy can balance better.
Light green make 4 small and 4 large circles
Small circles
Round 1: Magic circle 6 (6)
Cut off and stitch to back
Large circles
Round 1: magi circle 6 (6)
Round 2: INC in each ST (12)
Cut off and leave yarn for sewing. I spread them out and mixed them around until I found the posts I like.
Sew the belly piece from Row 25 to nearly the tip of the tail at 67-68.
Attach the decorative circles in a scattered pattern on the back,
Attach the head piece to rows 15-17
Nose horn got on Rows 2-5 and the forehead horns to round 12-14 with 4 stitches in between.
Attach the front legs to rows 32-38 and the back legs 47-51.